DIY surface cleaning
Okay, for all those who want to do it themselves, or who already do it themselves, here is a kind of best practice guide to help you get the best results.
MonoBlock:
So, before we start, in order to clean monoblock properly you really need high pressure and high flow, and we are talking along the lines of 2500psi and 10 litres per minute of water.
If you can’t manage this it can still be done, but it does become harder the less pressure and flow you have at your disposal.
Some tips before starting:
- Don’t try and do large areas all at once, keep it to 2-3 square meters of block at a time.
- Find where the water is going to drain to, if it is a groundwater drain on your property I’d suggest that you eithercover it off, surround it with a barrier or cover with a fine mesh, this will stop the excess muck being washed down your drains and possibly causing blockages. If it is going to run off into the street, how far will it run before getting to road drain, if it’s more than 5 meters or so you should be okay to start cleaning, as by the time the wash water gets to the drain 90% of the solids will have been left behind.
- Jet angle, (no, nothing to do with aircraft or flight!) always keep the lance at about 30 degrees to the surface being cleaned, aim it steeper than this and you run the risk of damaging the surface of the blocks, so try and hold the lance in a fixed position and move your whole body instead of moving only the lance, kind of like stepping back and forward with the lance held firmly and fixed at the required angle.
So, time to start jet washing!
- Begin at the highest point, so all the water/muck flow’s away from you
- Don’t just clean the surface of the block, try and clean between each block to a depth of approx 15-20mm, as this removes the contaminated jointing sand as well as the weeds and moss
- Once you have completed your defined area, stop with the close up blasting and either switch to a wide fan or use the hose with a spray attachment, and wash off the area you just blasted, really flood it with water to mobilise the dirt, and rinse it away from the newly cleaned area.
- After rinsing, check the area for stripes (areas where your water jet hasn’t over lapped properly) and re-clean any area’s that require it.
- Once you have done this you should then progress to the next area to be cleaned, blast another few meters clear, and then flood and rinse.
- You should now start to see the difference between the cleaned area’s and the dirty area’s, so keep going like this until you have blasted all your drive/path/patio clear, and have washed and rinsed it all down
Looking good?
Hopefully it is, so now you have cleaned the area, all the joints between the blocks should have been cleared, the block surfaces should all be clean and free of stripes, and the muck should be lying somewhere between the cleaned area and the drain, so the next step is to brush and shovel the muck into a bag or wheel barrow and remove it either to the local refuse collection site, or for reuse in your garden.
No, we’re not finished yet!
No way, now the fun part, if you haven’t done so already, you need to get yourself off to the nearest DIY or building store and buy some “Kiln dried sand” approximately 1 bag required for every 10sqm if you cleaned it properly (!) or a bit less if you didn’t get very deep between the joints.
So, once the blocks are totally dry (don’t try and spread sand on wet block!) spread the first bag of sand at your start point, 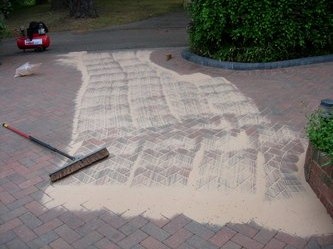 take a wide, soft brush and start sweeping the sand across the block, making sure that you cover all the joints with sand.
Once you have spread the first bag, and all the joints are filled, gently brush the excess off the top of the blocks and then spread another bag over the next area and repeat the process.
Once done all the gaps between the blocks should be nicely filled, and with no piles of excess sand laying on top of the blocks.
Once it gets a few days of rain you may find some joints where the sand has washed deeper, top these up occasionally and your nice monoblock driveway will stay flat and level and will be looking good for an other year!
Job done!
Paved Patio’s & Paths
Okay, so you’ve got the pressure washer, the time, and the desire (!) to do some pressure cleaning, what next?
Paved areas are the easiest to clean, and they generally respond well to a good high pressure blast, so here’s the quick and simple guide to cleaning your paths, patios and paved areas:
- First up, check the drainage options, where is all this water going to run to? Can the run off area take the amount of water you are going to deposit on it? Will it go to a drain, if so cover the drain with a fine mesh or block it completely, as you don’t really want to flush a lot of muck down your drains, it can easily cause blockages that can be costly to fix!
- If blocking it completely you will have to be prepared to brush or sqeejee off the water that collects as you work.
- Okay, you’ve sussed out the water run off and dealt with any drain issues that are likely to occur, so again, aim to start at the highest point of the area to be cleaned, as you don’t want to have much and dirt washing over the area you just cleaned.
Depending on the power of your pressure washer you want to keep the nozzle about 150-300mm from the paving and pointing at about 30 degrees to the surface to be cleaned